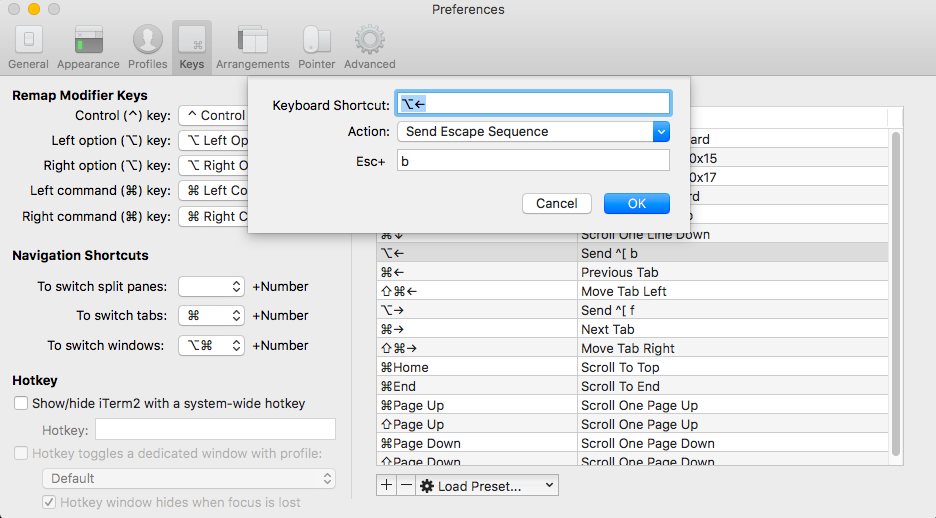
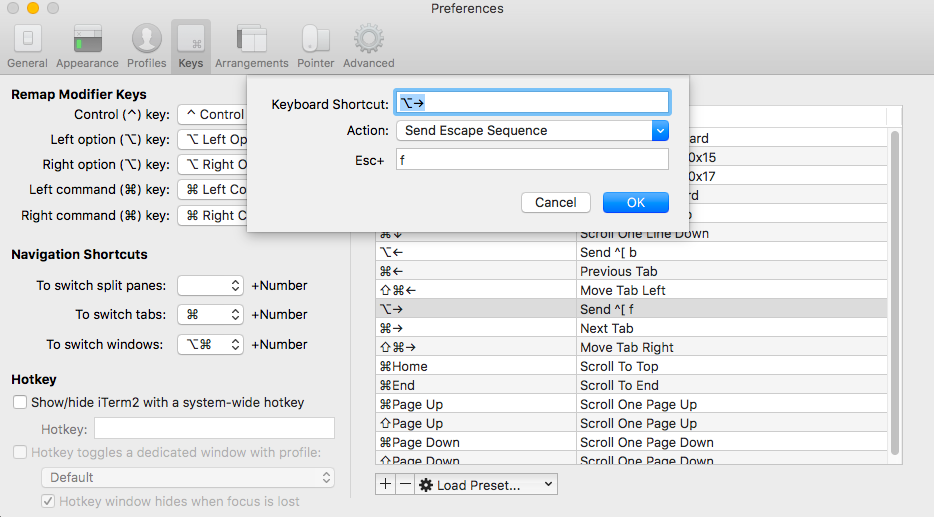
Moving around by using “Alt + Left or right arrow” key for words.
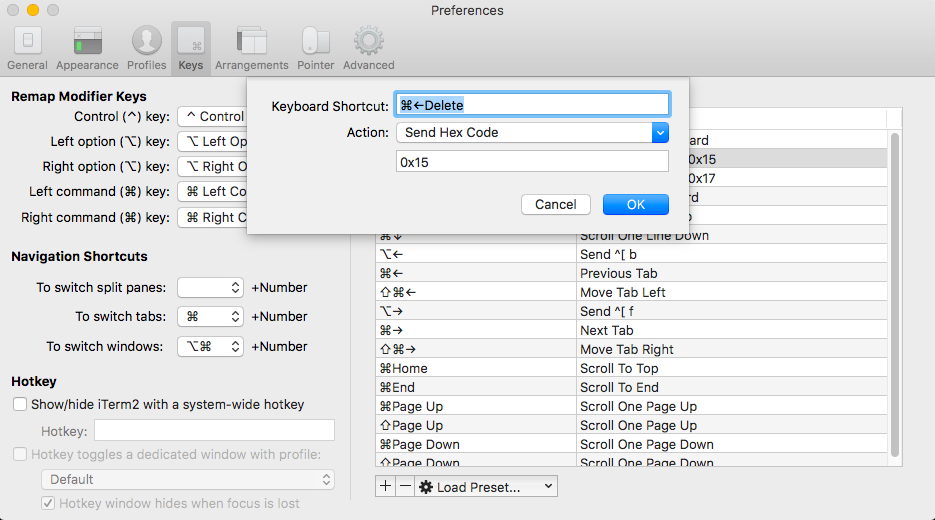
And deleting by word or by line.
Delete by word:
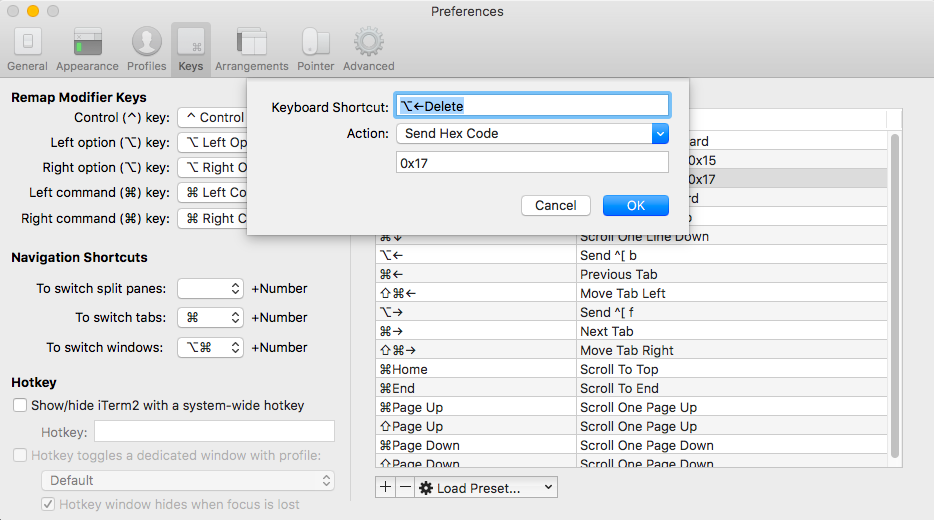
Delete by line:
Move cursor back one word:
Move cursor forward one word:
Sources:
https://coderwall.com/p/ds2dha/word-line-deletion-and-navigation-shortcuts-in-iterm2
Migrated everything to Linode now.
When you need to correctly display the leader-board based on ratings, you can’t just display the average rating for each entry.
------------------------------------
Restaurant A | 1 Vote(s) | Rating 10
------------------------------------
Restaurant B | 3 Vote(s) | Rating 6
                         | Rating 5
                         | Rating 4
------------------------------------
Restaurant C | 2 Vote(s) | Rating 3
                         | Rating 10
To correctly rank the data above you need to get the Bayesian Average for each restaurant. We have to take into account the number of votes for each restaurant. More votes would push it up the ranking while less votes would have little weight. This means that we if 1 restaurant had 1 vote and with rating of 10, it would not be the number one. (If we just got the average, it would be at the top! – and that would be wrong)
//In PHP
$avg_num_votes = 2;   //The average number of votes for all restaurants (1+3+2)/3 = 2
$avg_rating = 6.3333; //The average rating for all restaurants (10+6+5+4+3+10)/6 = 6.3333
$this_num_votes = 3;  //The number of votes for current restaurant (Restaurant B)
$this_rating = 5;     //The average rating for current restaurant (Restaurant B: (6+5+4)/3 = 5)

$bayesian_average = (($avg_num_votes * $avg_rating) + ($this_num_votes * $this_rating)) / ($avg_num_votes + $this_num_votes); |
Using the formula above, we would have the following ratings for each restaurant:
Restaurant A would have 7.55553 = ((2*6.3333) + (1*10)) / (2+1)
Restaurant B would have 5.53332 = ((2*6.3333) + (3*5)) / (2+3)
Restaurant C would have 6.41665 = ((2*6.3333) + (2*6.5)) / (2+2)
A quick solution using MySQL View Tables
Create View `ratings` AS
SELECT
    restaurant_id,
    (SELECT count(restaurant_id) FROM ratings) / (SELECT count(DISTINCT restaurant_id) FROM ratings) AS avg_num_votes,
    (SELECT avg(rating) FROM ratings) AS avg_rating,
    count(restaurant_id) as this_num_votes,
    avg(rating) as this_rating
FROM
    ratings
GROUP BY
restaurant_id |
To get the ratings for the restaurants:
SELECT
    restaurant_id,
    ((avg_num_votes * avg_rating) + (this_num_votes * this_rating)) / (avg_num_votes + this_num_votes) as real_rating
FROM `ratings` |
Would output something like:
restaurant_id    real_rating
1                7.555533333333
2                5.533320000000
3                6.416650000000
Sources:
http://blog.linkibol.com/2010/05/07/how-to-build-a-popularity-algorithm-you-can-be-proud-of/
http://snipplr.com/view/22559/
A simple CakePHP component that uses the Facebook PHP SDK (https://github.com/facebook/facebook-php-sdk).
Setup the component like this:
public $components = array(
    'Facebook' => array(
        'appId' => 'xxx',
        'secret' => 'xxx',
        'cookie' => true,
        'fileUpload' => 1,
        'canvas' => 1,
        'fbconnect' => 1,
        'display' => 'page',
        'scope' => 'user_about_me,email,publish_actions,publish_stream,photo_upload',
        'redirect_uri' => 'https://www.facebook.com/pages/My-Test-Page/12345?id=12345&sk=app_12345'
    )
); |
Then you should be able to do this in your controllers:
debug($this->userProfile);
debug($this->loginUrl);
debug($this->logoutUrl);
debug($this->hasLiked);
debug($this->signed_request); |
Grab it from Github: https://github.com/wenbert/CakePHP-Facebook-Component
I have come across many ones, but this one always worked for me without problems.
CSS
html, body { overflow: hidden; } |
Put this just after the tag:
Put this after you have jQuery and other libraries loaded. Don’t forget to put in your App ID.
$(document).ready(function() {
    window.fbAsyncInit = function() {
        FB.init({
            appId: FB_APP_ID,
            cookie: true,
            xfbml: true,
            oauth: true
        });

        FB.Canvas.setSize({height:600});
        setTimeout("FB.Canvas.setAutoGrow()",500);

    };
    (function() {
        var e = document.createElement('script'); e.async = true;
        e.src = document.location.protocol +
            '//connect.facebook.net/en_US/all.js';
        document.getElementById('fb-root').appendChild(e);
    }());
}); |
I forgot where I got this from but if anyone knows, flick me an email!
Posted in Uncategorized
|
Tagged facebook
|
This code is from http://stackoverflow.com/q/12916539/66767 combined with http://stackoverflow.com/a/15387732/66767 to auto-link URLs and hashtags.
Quick and dirty… copy and paste below!
<?php
function buildBaseString($baseURI, $method, $params) {
    $r = array();
    ksort($params);
    foreach($params as $key=>$value){
        $r[] = "$key=" . rawurlencode($value);
    }
    return $method."&" . rawurlencode($baseURI) . '&' . rawurlencode(implode('&', $r));
}

function buildAuthorizationHeader($oauth) {
    $r = 'Authorization: OAuth ';
    $values = array();
    foreach($oauth as $key=>$value)
        $values[] = "$key=\"" . rawurlencode($value) . "\"";
    $r .= implode(', ', $values);
    return $r;
}

$url = "https://api.twitter.com/1.1/statuses/user_timeline.json";

$oauth_access_token = "XXX";
$oauth_access_token_secret = "XXX";
$consumer_key = "XXX";
$consumer_secret = "XXX";

$oauth = array( 'screen_name' => 'wenbert',
                'count' => 2,
                'oauth_consumer_key' => $consumer_key,
                'oauth_nonce' => time(),
                'oauth_signature_method' => 'HMAC-SHA1',
                'oauth_token' => $oauth_access_token,
                'oauth_timestamp' => time(),
                'oauth_version' => '1.0');

$base_info = buildBaseString($url, 'GET', $oauth);
$composite_key = rawurlencode($consumer_secret) . '&' . rawurlencode($oauth_access_token_secret);
$oauth_signature = base64_encode(hash_hmac('sha1', $base_info, $composite_key, true));
$oauth['oauth_signature'] = $oauth_signature;

// Make Requests
$header = array(buildAuthorizationHeader($oauth), 'Expect:');
$options = array( CURLOPT_HTTPHEADER => $header,
                  //CURLOPT_POSTFIELDS => $postfields,
                  CURLOPT_HEADER => false,
                  CURLOPT_URL => $url.'?screen_name=wenbert&count=2',
                  CURLOPT_RETURNTRANSFER => true,
                  CURLOPT_SSL_VERIFYPEER => false);

$feed = curl_init();
curl_setopt_array($feed, $options);
$json = curl_exec($feed);
curl_close($feed);

$twitter_data = json_decode($json);
?>

<b>Twitter Updates:</b>
<div>
    <?php
    foreach($twitter_data AS $single_tweet){
        //http://stackoverflow.com/a/15387732/66767
        $tweet = $single_tweet->text;
        $tweet = preg_replace("/([\w]+\:\/\/[\w-?&;#~=\.\/\@]+[\w\/])/", "<a target=\"_blank\" href=\"$1\">$1</a>", $tweet);
        $tweet = preg_replace("/#([A-Za-z0-9\/\.]*)/", "<a target=\"_new\" href=\"http://twitter.com/search?q=$1\">#$1</a>", $tweet);
        $tweet = preg_replace("/@([A-Za-z0-9\/\.]*)/", "<a href=\"http://www.twitter.com/$1\">@$1</a>", $tweet);
        echo($tweet);
    }
    ?>
</div> |
The configuration:
<?php
// app/Config/core.php
Configure::write("App.SITE_URL", 'http://www.mysite.com');
Configure::write("App.UPLOAD_PATH", '/usr/local/www/vhosts/mysite.com/httpdocs/app/webroot/uploads'); //no trailing slash
Configure::write("App.UPLOAD_PATH_URL", 'http://mysite/uploads'); //no trailing slash |
The setting up the .json and .txt extensions in the routes file.
I need the txt. This is because Internet Explorer does not accept 'application/json'.
Without the .txt, IE will send a “Save as” dialog box when the upload is successful.
// app/Config/routes.php
Router::parseExtensions('json', 'txt'); |
I have the following for the View:
<?php
// app/View/News/json/fineupload.ctp
echo json_encode($result); |
And
<?php
// app/View/News/txt/fineupload.ctp
echo json_encode($result); |
Take note that both are in different directories.
In my controller:
<?php
class NewsController extends AppController {
    public $helpers = array('Html', 'Form');
    public $components = array('RequestHandler', 'Security');

    public function beforeFilter() {
        parent::beforeFilter();

        if (AuthComponent::user('role') === 'admin' OR AuthComponent::user('role') === 'user') {
            $this->Auth->allow('index', 'add', 'edit', 'fineupload');
            if(isset($this->Security) && ($this->RequestHandler->isAjax() || $this->RequestHandler->isPost()) && $this->action == 'fineupload'){
                $this->Security->validatePost = false;
                $this->Security->enabled = false;
                $this->Security->csrfCheck = false;
            }
        }
    }

    /* --- snipped --- */

    public function edit($id = null) {
        $this->layout = 'admin';

        $this->News->id = $id;

        if(!$this->News->exists()) {
            throw new NotFoundException('News not found');
        }
        if(!($this->request->is('post') || $this->request->is('put'))) {
            $this->set('id', $id);
            $this->request->data = $this->News->read(null, $id);
        } else {
            if($this->News->save($this->request->data)) {
                //$this->Session->setFlash( __('The news has been updated'), 'success');
                return $this->redirect(array('action' => 'index'));
            } else {
                //$this->Session->setFlash('The news could not be saved.', 'error');
            }
        }
    }

    /* --- snipped --- */

    public function fineupload() {
        $this->layout = false;

        $result = array();

        // debug($_FILES);
        // array(
        //     [qqfile] => array(
        //         [name] => [share1_glass.gif],
        //         [type] => [image/gif],
        //         [tmp_name] => [C:\wamp\tmp\phpA755.tmp],
        //         [error] => (int) 0,
        //         [size] => (int) 120358
        //     )
        // )

        $temp_file       = $_FILES['qqfile']['tmp_name'];
        $target_filename = $_FILES['qqfile']['name'];
        $upload_path     = Configure::read("App.UPLOAD_PATH");
        $target_filepath = $upload_path.'/'.$target_filename;
        move_uploaded_file($temp_file, $target_filepath);

        $result['status']   = 'success';
        $result['message']  = 'Upload successful.';
        $result['filename'] = $target_filename;
        $result['webpath']  = Configure::read("App.UPLOAD_PATH_URL").'/'.$target_filename;
        $result['upload_dir'] = Configure::read("App.UPLOAD_PATH_URL");

        $this->set('result', $result);
} |
Then in the HTML part – this is the part where we setup the FineUpload Javascript.
<!-- Fine Uploader -->
<!-- You could load these javascript files the CakePHP way -->
<script type="text/javascript" src="/js/fineuploader/header.js"></script>
<script type="text/javascript" src="/js/fineuploader/util.js"></script>
<script type="text/javascript" src="/js/fineuploader/handler.xhr.js"></script>
<script type="text/javascript" src="/js/fineuploader/handler.base.js"></script>
<script type="text/javascript" src="/js/fineuploader/handler.form.js"></script>
<script type="text/javascript" src="/js/fineuploader/button.js"></script>

<script type="text/javascript" src="/js/fineuploader/uploader.js"></script>
<script type="text/javascript" src="/js/fineuploader/uploader.basic.js"></script>

<script>
    $(document).ready(function() {
    $fub = $('#fine-uploader-basic');
    $messages = $('#messages');

    //for IE, we would load the mysite.com/news/fineupload.txt
    //it would return text instead of application/json
    //if we do not do this, Internet Explorer would display a "Save as" dialog box
    if($.browser.msie) {
        var request_ext = 'txt';
        //http://mysite.com/news/fineupload.txt
    } else {
        var request_ext = 'json';
        //http://mysite.com/news/fineupload.json
    }
    var uploader = new qq.FineUploaderBasic({
            button: $fub[0],
            multiple: false,
            request: {
                endpoint: '<?php echo $this->webroot ?>news/fineupload.'+request_ext
            },
            validation: {
            allowedExtensions: ['jpeg', 'jpg', 'gif', 'png', 'pdf'],
            sizeLimit: 204800 // 200 kB = 200 * 1024 bytes
        },
        callbacks: {
            onSubmit: function(id, fileName) {
                $messages.html('<div id="file-' + id + '" class="alert" style="margin: 20px 0 0"></div>');
            },
            onUpload: function(id, fileName) {
                $('#file-' + id).addClass('alert-info')
                                .html('<img src="<?php echo Configure::read("App.SITE_URL") ?>/loading.gif" alt="Initializing. Please hold."> ' +
                                    'Initializing ' +
                                    '“' + fileName + '”');
            },
            onProgress: function(id, fileName, loaded, total) {
                if (loaded < total) {
                progress = Math.round(loaded / total * 100) + '% of ' + Math.round(total / 1024) + ' kB';
                $('#file-' + id).removeClass('alert-info')
                                .html('<img src="<?php echo Configure::read("App.SITE_URL") ?>/loading.gif" alt="In progress. Please hold."> ' +
                                        'Uploading ' +
                                        '“' + fileName + '” ' +
                                        progress);
                } else {
                $('#file-' + id).addClass('alert-info')
                                .html('<img src="<?php echo Configure::read("App.SITE_URL") ?>/loading.gif" alt="Saving. Please hold."> ' +
                                        'Saving ' +
                                        '“' + fileName + '”');
                }
            },
            onComplete: function(id, fileName, responseJSON) {
                console.log('ID: '+id);
                console.log('fileName: '+fileName);
                if (responseJSON.status == 'success') {
                    $('#file-' + id).removeClass('alert-info')
                                    .addClass('alert-success')
                                    .html('<i class="icon-ok"></i> ' +
                                            'Successfully saved ' +
                                            '“' + fileName + '”');
                    $('#NewsExternalUrl').val(responseJSON.webpath);
                } else {
                $('#file-' + id).removeClass('alert-info')
                                .addClass('alert-error')
                                .html('<i class="icon-exclamation-sign"></i> ' +
                                        'Error with ' +
                                        '“' + fileName + '”: ' +
                                        responseJSON.error);
                }
            }
        }
    });
    });
</script>
<div id="fine-uploader-basic" class="btn btn-small">
    <i class="icon-upload icon"></i> Click to upload a file instead of using the Content textarea below.
</div>
(pdf, jpg, gif, png files only)
<div id="messages"></div> |
FineUploader / File Uploader
http://fineuploader.com/
https://github.com/valums/file-uploader/
Sometimes, I need to disable the Security component for certain actions in the controller. For example, if I need to handle FineUpload.
If I do not disable the Security component, I get a “request has been blackholed” error.
<?php
class NewsController extends AppController {
    public $helpers = array('Html', 'Form');
    public $components = array('RequestHandler', 'Security');

    public function beforeFilter() {
        parent::beforeFilter();

        if (AuthComponent::user('role') === 'admin' OR AuthComponent::user('role') === 'user') {
            //only allow access to these actions when the role is admin/user
            $this->Auth->allow('index', 'add', 'edit', 'delete', 'view', 'fineupload');

            //Here, we disable the Security component for Ajax requests and for the "fineupload" action
            if(isset($this->Security) &&  ($this->RequestHandler->isAjax() || $this->RequestHandler->isPost()) && $this->action == 'fineupload'){
                $this->Security->validatePost = false;
                $this->Security->enabled = false;
                $this->Security->csrfCheck = false;
            }
        }
    }
/*rest of the code*/ |
For example, an Article has an Author. In the database, the Article table would have an author_id field. Assuming that we are following the CakePHP Model and Database Conventions (http://book.cakephp.org/2.0/en/getting-started/cakephp-conventions.html#model-and-database-conventions), the models would look something like these:
<?php
## /Model/Article.php
App::uses('AuthComponent', 'Controller/Component');

class Article extends AppModel {
    public $name = 'Article';

    public $belongsTo = array(
        'Author' => array(
            'className' => 'Author',
            'foreignKey' => 'author_id'
        ),
    );
} |
An Article that uses the articles table which belongs to an Author. The article table has a field named author_id. The author_id is linked to the id found in the author table.
The Author Model would be:
<?php
## /Model/Author.php
App::uses('AuthComponent', 'Controller/Component');

class Author extends AppModel {
    public $name = 'Author';

    public $hasMany = array(
        'Article' => array(
            'className' => 'Article',
            'foreignKey' => 'author_id'
        ),
    );
} |
An Author uses the author table and has many Article. The article table has an author_id to link to it’s Author.
Now in one of my controllers, I would have a method that will allow me to add an Article and specify the Author. The Author field would be a dropdown / selectbox.
<?php
## /Controllers/ArticlesAdminController.php
//snip
    public function add() {
        $this->layout = 'admin';
        $this->loadModel('Author');
        $this->loadModel('Article');
        $authors = $this->Author->find('list'); //we get the authors from the database
        $this->set('authors', $authors);

        if ($this->request->is('post')) {
            $this->Article->create();
            if ($this->Article->save($this->request->data)) {
                $this->Session->setFlash( __('The Article has been saved'), 'success');
                return $this->redirect(array('action' => 'index'));
            } else {
                $this->Session->setFlash(__('The Article could not be saved. Please, try again'), 'error');
                //throw new InternalErrorException (__('The user could not be saved. Please, try again'));
            }

        }
} |
Finally, we have the view (/View/ArticlesAdmin/add.ctp).
<h1><?php echo __('Add Article'); ?></h1>
<?php
    echo $this->Form->create('Article', array('class' => 'well'));

    echo $this->Form->input('title',
        array(
            'class' => 'span5',
            'after' => ' <span class="required_indicator">(required)</span> ',
            'error' => array('attributes' => array('wrap' => 'span', 'class' => 'label custom-inline-error label-important help-inline'))
        ));

    //the rest of the Article fields here...

    //The selectbox / dropdown menu for the Author field
    echo $this->Form->input('author_id',
        array(
            'options' => $authors,
            'class' => 'span5',
            'error' => array('attributes' => array('wrap' => 'span', 'class' => 'label custom-inline-error label-important help-inline'))
        ));

?>
<?php echo $this->Form->end(__('Submit')) ?> |
Let’s say that Configure::read('App.uploads_temp') is somewhere outside the public accessible directory: /var/www/yourapp/private
//This goes into the controller
    /**
     * @param $filename A filename without the path. EG: default-guy.jpg
     */
    public function downloadimage($filename) {
        $file_parts = pathinfo($filename);
        $this->viewClass = 'Media';
        $params = array(
            'id'        => $filename,
            'name'      => $file_parts['basename'],
            'download'  => false,
            'extension' => $file_parts['extension'],
            'path'      =>Configure::read('App.uploads_temp'). DS
        );
        $this->set($params);
} |
You can view the image through the URL:
http://yourapp.com/entries/downloadimage/sample-image.jpg |
Reference: http://book.cakephp.org/2.0/en/views/media-view.html

 twitter.com/wenbert